Simple Meals

Recipe: Crispy Golden Arancini

Join me on a bite-sized adventure ….

Who doesn't love a good food story? Let me take you on a journey through the warm, golden, and utterly satisfying world of Crispy Golden Arancini. These delectable rice balls are more than just a meal—they’re an edible hug, perfect for any occasion, from a cozy dinner to a festive party platter. Whether you’re a seasoned cook or a curious foodie, this recipe promises fun, flavour, and a sprinkle of kitchen magic.

What are Arancini?

Originating from Sicily, arancini are proof that Italians truly understand the art of comfort food. These crispy, golden nuggets of joy are traditionally made with leftover risotto, stuffed with savory fillings, and deep-fried to perfection. Think of them as a hybrid between a rice ball and a deliciously crunchy surprise package. think of it as the “Italian Kinder Surprise”. And the best part? They’re incredibly versatile, allowing you to put your own spin on the filling.

Now, let’s dive into creating these spheres of crispy golden goodness step by step!

Pro Tips for Arancini Success

  • Chill Time is Key: Don’t rush the cooling process. The rice and filling need to be cold to form proper balls that won’t fall apart.

  • Oil Temperature Matters: Keep the oil at 350°F for perfectly crisp and golden results.

  • Customize the Filling: Experiment with different cheeses, vegetables, or even a dollop of pesto in the center for a unique twist.

The Process

1. Cook the Rice

Sauté onions in olive oil and butter, then add tomato paste, broth, and rice. Cook until fluffy, stir in cheese, and spread on a tray to cool.

2. Make the Filling

Sauté diced veggies, then brown the beef. Add tomato paste, peas, and water for a glossy, flavorful mixture. Chill it for easy handling.

3. Shape and Stuff

Scoop rice, add filling and mozzarella, and shape into balls. Be firm but gentle to keep them intact.

4. Coat and Fry

Dip in beaten eggs, roll in breadcrumbs, and fry until golden and crisp.

Simple steps for a crispy, cheesy delight! Now, let’s get rolling. 🍴


Crispy Golden Arancini

Prep time: 15 minutes
Cook time: 40 minutes
Cooling time: 1 hour 20 minutes|Total time: 2 hours 15 minutes 
Servings: 8 Arancini

Ingredients

For the Rice:
1/4 cup olive oil
1/4 of a large onion, diced
1/2 cup unsalted butter, divided
1 tablespoon tomato paste
4 cups chicken broth (or vegetable)
2 1/4 cup arborio rice
1 cup freshly grated Pecorino (or Parmegiano Reggiano)

For the Filling:
1/4 cup olive oil
1 carrot, peeled and diced
1 stalk celery, diced
1/2 onion, diced
1 lb (approx 500g) lean ground beef
1/2 cup tomato paste
1/2 cup frozen peas
1/3 - 1/2 cup water
Salt and pepper to taste

For the Crispy Coating and Assembly:
2 eggs, beaten
Plain bread crumbs 
1 ball fior di latte fresh mozzarella, diced into tiny cubes
Shredded mozzarella

Instructions

Cook the Rice:

  • Heat a large pot on medium heat and add the olive oil and chopped onion and continuously stir while cooking for 5 minutes or until the onion is soft, with a sweet scent and transparent in colour. 

  • Add 1/4 cup butter, tomato paste and stir and cook for one minute to melt the butter. Slowly pour in the chicken/vegetable broth, stir, and bring to a boil.

  • Add the rice, stir, reduce the heat to a simmer and cover with a lid. Cook the rice until the water is gone and the rice is fluffy. This may take anywhere from 10-15 minutes or follow the cook time on the package.

  • When the rice is cooked, add the remaining 1/4 cup of butter, grated cheese, and stir until it’s incorporated. 

  • Now spread the hot rice straight onto a large rimmed baking sheet in an even layer using a spatula or the back of a wooden spoon and allow the rice to cool at room temperature rest for one hour. 

Cook the Filling:

  • In a large frying pan add the olive oil, celery, onions, and carrot and while stiring cook on medium heat for 10 minutes, or until vegetables have softened and fork tender. 

  • Add the ground beef the to vegetable mixture until it is browned, about 10 minutes.

  • Pour in the peas, add the tomato paste, salt and pepper to tase,  water and stir to combine and coat the meat mixture. Reduce the heat to a simmer and cook for about 20 minutes. Add extra water if you find the mixture is dry. You want to keep it glossy and not sticking to the spoon.

  • Transfer the cooked meat mixture to a large bowl it to cool in the refrigerator for at least one hour.

Forming the Arancini:

  • Take your chilled rice onand form a pocket/bowl shape in the palm of your non dominate hand; scoop a generous amount of the meat mixture and drop it into the centre of the pocket of rice, top with a sprinkle of fresh and shredded mozzarella.

  • Take another scoop of rice and place it on top of the rice and mixture in your other hand and cupping your hands together begin to form a ball. You want to ensure you are using enough pressure to keep it together without squeezing it and causing the filling to spill out. 

  • Place the formed Arancini on a parchment lined baking tray.

  • Set up your dredge station by adding the beaten eggs to a shallow bowl and breadcrumbs to another. Roll each Arancini in the eggs and then into the breadcrumbs making sure to cover the entire rice ball with breadcrumbs. Set them aside back onto the lined tray and repeat until you have coated them all.

  • In a large pot heat your canola oil to 350°F on medium heat. Using a slotted spoon gently add a couple of Arancini in at a time (depending on the size of your pot), making sure they are not touching and have enough room to move around.

  • Fry each rice ball for about 5-7 minutes, or until they are crispy when tapped with a spoon and golden brown.

  • Enjoy it with a few scoops of fresh tomato sauce or plain. Both are delicious. 

Print Friendly and PDF

Recipe: Buttery Lemon Salmon

Indulge in this delightful Buttery Lemon Salmon, perfect for any occasion. This dish features salmon fillets seared to perfection and bathed in a rich, zesty garlic lemon butter sauce. Simple yet full of vibrant flavours, it’s an impressive dish that’s ready in under 30 minutes, ideal for busy weeknights or special gatherings. Fresh lemon juice and zest enhance the salmon’s natural taste, while a hint of garlic and fresh parsley bring out its best qualities.

A plate of pan-seared salmon, golden appearance served over fluffy white rice and sautéed rapini and asparagus. The scene includes small dishes with spices, and subtle background elements like lemons and an olive oil bottle on a kitchen counter.

Buttery Lemon Salmon

Prep Time: 5 minutes
Cook Time: 15 minutes
Total Time: 20 minutes
Servings: 4

Ingredients

For the Salmon:
4 salmon fillets (6-8 ounces each), skin-on or skinless
Salt and black pepper, to taste
2 tablespoons olive oil
1 teaspoon paprika (optional, for added depth of flavour)

For the Garlic Lemon Butter Sauce:
4 cloves garlic, minced
1/4 cup fresh lemon juice (approximately 2 lemons)
Zest of 1 lemon
1/2 cup unsalted butter
2 tablespoons fresh parsley, finely chopped
Salt and black pepper, to taste

Instructions

  • Step 1: Prepare the Salmon
    Pat the salmon fillets dry with paper towels. Generously season both sides with salt, black pepper, and paprika if using.

  • Step 2: Sear the Salmon
    In a large oven-safe skillet, heat 2 tablespoons of olive oil over medium-high heat.

  • Place the salmon fillets in the skillet, skin-side down if applicable.

  • Sear for 3-4 minutes without moving the fillets to create a golden-brown crust.

Step 3: Make the Garlic Lemon Butter Sauce

  • Melt the butter in a separate saucepan over medium heat.

  • Add the minced garlic and sauté for 1-2 minutes until fragrant.

  • Mix in the lemon juice and zest, letting the sauce simmer for 2-3 minutes until slightly reduced and thickened.

  • Season with salt and black pepper to taste, adjusting as needed.

  • Serve the salmon with a generous drizzle of the garlic lemon butter sauce, garnished with fresh parsley. Enjoy!

Notes

  • Store leftovers in an airtight container in the fridge for up to 3 days.

  • Feel free to add any fresh or dry herbs you like to the butter sauce. Make it your own.

Print Friendly and PDF

Recipe: Roasted Tomato Bisque

There’s something magical about soup—especially when it’s a velvety, rich tomato bisque. As the days grow shorter and the air gets cooler, this Roasted Tomato Bisque is the perfect way to warm up and nourish your soul. The combination of roasted vine-ripened tomatoes, fragrant garlic, sweet shallots, and fresh basil gives this dish a depth of flavour that’s hard to beat. Whether you’re craving a hearty lunch or a cozy dinner, this soup is the perfect go-to recipe.

Let’s walk through why this Roasted Tomato Bisque is going to be your new favourite.

Why Roasting the Tomatoes Makes All the Difference

What sets this tomato bisque apart from others is the roasting process. Roasting tomatoes concentrates their natural sweetness, caramelizing the sugars and bringing out that deep, rich flavour. Paired with garlic and shallots, the roasted tomatoes offer an almost smoky essence that gives the soup an extra layer of complexity.

Not only does roasting enhance the flavour, but it’s also super easy. Simply halve the tomatoes, toss them into a baking dish along with garlic, shallots, and a drizzle of olive oil and balsamic glaze, then pop them in the oven. In 30-40 minutes, you’ve got a beautifully caramelized base that will make your bisque shine.

Building Flavour in the Dutch Oven

While your tomatoes are roasting, you can start building the flavour base for the soup. In a large Dutch oven, sauté diced onions, carrots, and celery. This trio—known as mirepoix—adds a subtle sweetness and savoury foundation to the soup. After a quick sauté, canned San Marzano tomatoes, russet potatoes, and chicken broth join the party, simmering until everything is tender.

One of the key ingredients here is the Italian seasoning, which brings a delightful herbaceous note that pairs perfectly with the roasted tomatoes. Just a pinch of cayenne and black pepper adds a subtle kick, balancing the sweetness of the vegetables.

Blending It All Together

Once the vegetables are tender and the flavours have melded together, it’s time to bring everything together. Add the roasted tomatoes and blend it all into a silky-smooth texture using an immersion blender. This step ensures every bite is filled with rich, velvety goodness.

To finish off the soup, stir in a cup of heavy cream. The cream adds a luscious richness to the bisque, making it creamy without overpowering the fresh tomato flavour.

Serving Suggestions

Now comes the best part—serving the soup! Ladle the bisque into bowls and top it with your favourite garnishes. Croutons add a delightful crunch, while freshly grated Parmesan or slices of creamy brie take this dish to the next level. A few torn basil leaves not only add a burst of freshness but also tie the whole dish together.

Pair this bisque with a classic grilled cheese or enjoy it on its own with a warm baguette. Either way, it’s guaranteed to be a hit.

Why You’ll Love This Recipe

  • Simple ingredients: You probably have most of these items in your pantry already!

  • Rich, deep flavours: The roasted tomatoes and caramelized veggies give this soup its signature taste.

  • Customizable toppings: Whether you’re team croutons or brie, this bisque is a canvas for your favourite add-ons.

  • Perfect for meal prep: Make a big batch and enjoy it throughout the week!

Roasted Tomato Bisque is the perfect blend of comfort and sophistication. Whether you're hosting a dinner party or looking for a comforting solo meal, this soup is versatile, packed with flavour, and easy to prepare. The roasted tomatoes truly elevate the dish, and when paired with fresh, simple ingredients, the result is nothing short of spectacular.

Give this recipe a try and let the cozy flavours of roasted tomato bisque warm your day. Don't forget to comment. Let me know if you’ve tried the recipe and share your creations!

Happy Soup Season!

Roasted Tomato Bisque

Prep Time: 15 minutes
Cook Time: 45 minutes
Total Cook Time: 1 hour
Servings: 6 

Ingredients

For the Roasted Tomatoes:
1lb of Vine Ripe Tomatoes, halved
1 large shallot, quartered
3 garlic cloves, smashed and peeled
4 basil leaves, torn
Olive Oil
2 tsp balsamic glaze
Salt and pepper to taste

Into the Dutch Oven:
2 tbsp of olive oil
1 yellow onion, diced
2 of each: large carrots, celery stalks. Peeled and roughly chopped into 2 inch pieces
1 large russet potato, peeled and diced
796 ml can of san marzano or plum tomatoes
4 cups chicken broth
1 tbsp Italian seasoning
1/2 tsp kosher salt
1 pinch of each: cayenne and black pepper
1 cup heavy cream

Toppings (optional):
Croutons
Freshly grated parmesan Or a few slices of creamy brie
Fresh basil

Instructions

  • Preheat your oven to 400°F. Line a small rimmed baking dish with parchment paper, add the halved tomatoes, shallots, garlic, basil, (pack the tomatoes in, no spaces) drizzle olive oil, balsamic glaze, a sprinkle of salt, mix to coat everything and into the oven for 30-40 minutes.

  • While the tomatoes roast, add olive oil, onions, carrots, celery and salt to a large dutch oven, saute for 5 minutes or until the onions are translucent. Add in the canned tomatoes, potato, broth, Italian seasoning, salt, cayenne and black pepper stir and bring to boil. Lower the heat to medium low and simmer for 40 minutes or until the veggies are fork tender.

  • Add the roasted tomatoes to the pot, remove it from the heat, with an immersion blender, blitz it all up until smooth and no lumps. Add the cream stir and serve it up!

Print Friendly and PDF

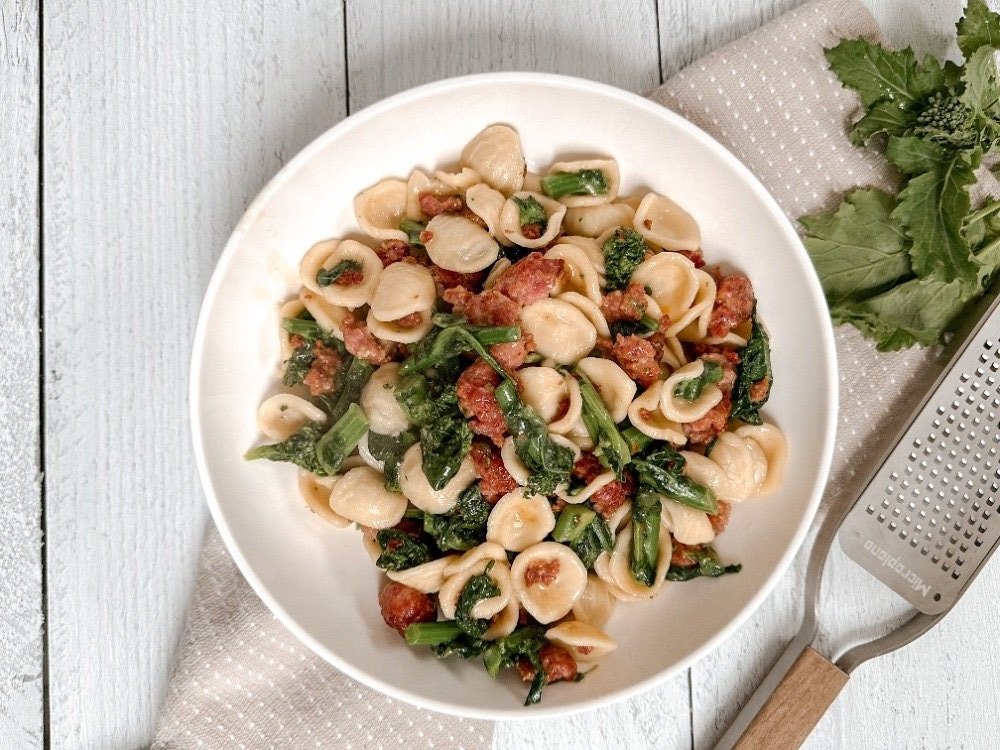
Recipe: Simple Orecchiette with Rapini and Italian Sausage

Your New Go-To Weeknight Dinner

Looking for a delicious twist to your weeknight dinners? This Orecchiette with Rapini and Italian Sausage recipe is not only simple to prepare but also brimming with flavours that promise to transport your taste buds straight to Italy. The orecchiette scoops up every bit of the rich, spicy sausage and the rapini adds just the right touch of earthiness.  

Whether you’re cooking for one or feeding a crowd, this dish will impress anyone who takes a bite.

Orecchiette with Rapini and Italian Sausage

Prep 10 minutes
Cook 25 minutes
Total 35 minutes
Servings 4-6 

Ingredients

1 lb mild Italian sausage (about 4 links), casings removed
1 bunch rapini (broccoli rabe), washed and 2" trimmed off stems
454g (1 lb) uncooked orecchiette
2 Tbsp olive oil, plus more for serving 
3 cloves garlic, minced or finely chopped
¼ tsp crushed red pepper flakes
½ cup grated Parmigiano Reggiano or Pecorino Romano cheese
Salt and freshly ground black pepper to taste

Instructions

  • Bring a large pot of salted water to a boil. Add trimmed rapini hen cook for 3 minutes. Use tongs to transfer to an ice bath, and return the water in the pot to a boil.

  • Add the orecchiette to the boiling water and cook according to package instructions until al dente. Before draining, reserve 1 cup of the pasta water.

  • In a large pan, heat 2 Tbsp olive oil over medium-high heat. Add the sausage, breaking up with the back of a wooden spoon, then cook until browned on all sides, about 5-7 minutes. Add minced garlic and crushed red pepper flakes, then cook 1 minute more.

  • Drain the rapini from the ice bath then give it a rough chop to bite-size pieces. Add rapini and cooked pasta to the cooked Italian sausage in the pan. Stir in about ½ cup grated Parmesan (or Pecorino) and ½ cup reserved pasta water, then taste and adjust seasoning as needed.

  • Serve in bowls with a drizzle of olive oil, additional grated cheese, a pinch of salt, and lots of freshly ground black pepper.

Notes

  • Store leftovers in an airtight container in the fridge for up to 3 days.

  • The best way to reheat pasta is in a pan over medium heat. Add a little bit of olive oil to the skillet and cook the pasta until warmed through. You can also reheat pasta in the microwave, but be careful not to overcook it because no one likes mushy pasta.


Print Friendly and PDF

Recipe: Quick Chunky Beef Chili

Over the years I’ve made many pots of chili but this quick and chunky chili recipe is my absolute favourite. I like to add fresh jalapeños, cheese, sour cream, green onion, and forget the spoon just use crispy tortilla chips instead!

Frequently Asked Questions:

CAN YOU FREEZE CHILI?

Yes, chili is the perfect freezer meal. Divide the cooked chili it into single portions and let it cool. Label the container with the contents and date, then transfer to the freezer. You can keep your chili in the freezer for about three months.

To reheat, simply let the chili thaw in the refrigerator over night and reheat in a pot over low heat, adding water if needed, until warm, or microwave on high for 2 minutes.


HOW LONG SHOULD YOU COOK CHILI?

You’ll want to let this chili simmer for a minimum of 30 minutes, but it’s something that you can leave simmering gently for up to a couple of hours. Chili is one of those dishes that tastes better the longer it cooks. If you do plan to let your chili simmer for a longer period of time, make sure to cover the pot with a lid so it doesn’t dry out. Check it occasionally to make sure all the liquid hasn’t evaporated. If it has, simply add a little water or beef broth.

Quick Chunky Beef Chili

Prep Time 5 minutes
Cook Time 30 minutes
Total Time 35 minutes
Author Mary Mammoliti | Kitchen Confession

Ingredients

1 1/2 pound lean ground beef
2 tablespoon olive oil
1 medium onion chopped
2 tablespoons tomato paste
1 red bell pepper, diced
1 teaspoon Worcestershire sauce
1 teaspoon soy sauce
1 1/2 teaspoons unsweetened cocoa powder
2 tablespoons chili powder
1 teaspoon garlic powder
1 teaspoon ground cumin
1 teaspoon smoked paprika
1/2 teaspoon cayenne pepper, optional
1 (19 fl oz/540 ml) can red kidney beans, drained & rinsed
1 (19 fl oz/540 ml) can pinto beans, drained & rinsed
1 (28 fluid ounce) can fire-roasted diced tomatoes with juices
1 cup beef broth (add more if you like)
Salt & pepper to taste

Toppings (optional)

Shredded cheddar cheese
Sour cream 
Sweet Potato Tortilla Chips

Instructions

  1. Add olive oil to a large pot over medium-high heat.

  2. Add the beef to the pot and cook for 5 minutes, breaking it up as you go, until brown.

  3. Pour in the onion and red bell pepper and sauté for 5 minutes or until softened.

  4. Stir in the tomato paste, Worcestershire sauce, soy sauce and stir until tomato paste has coated the beef mixture.

  5. Add the beans, diced tomatoes, beef broth, cocoa powder, chili powder, garlic powder, cumin, paprika, and cayenne pepper.

  6. On high heat bring the ingredients to a gentle boil, reduce the heat, cover leaving a slight opening and let it simmer for 30 minutes, stirring occasionally.

  7. Taste and add more salt & pepper if needed, serve with desired toppings and enjoy.

Print Friendly and PDF

Recipe: The Best Cheese and Broccoli Soup

In my opinion, Cheese and Broccoli Soup the ultimate comfort food! It’s deliciously cheesy, rich, creamy, and exactly what a warm bowl of comfort food should be. This soup is truly one of the best bowls of cheese and broccoli I’ve had in a long time! Made with minimal ingredients, it’s hearty, loaded with broccoli, brimming with fresh flavours and it’s easy to make. Bring on sweater weather, I’m ready!

Pin this recipe and get ready to make this warm and cozy soup all winter long. Soups really do make the colder months much more bearable - am I right?

For a step by step video on how to make this Tasty Cheese and Broccoli Soup visit my Instagram @kitchenconfession

The Best Cheese and Broccoli Soup

Prep Time: 15 minutes
Cook Time
: 45 minutes
Total Time: 60 minutes
Serves: 3-4 decent sized bowls

INGREDIENTS

  • 1 tablespoon + 4 tablespoons unsalted butter, divided

  • 1 medium onion, finely diced

  • 1 clove garlic, minced

  • 1/4 cup all-purpose flour

  • 2 cups low-sodium chicken stock

  • 2 cups half-and-half cream

  • 3-4 cups broccoli florets and stems, diced into bite-size pieces

  • 2 large carrots, peeled, and sliced into thin rounds, about 1/16th-inch

  • 1 teaspoon kosher salt

  • Freshly ground black pepper to taste

  • 1/2 teaspoon paprika

  • 1/2 teaspoon dry mustard powder

  • pinch cayenne pepper

  • 8 - 10 ounces (280g) grated aged cheddar cheese, reserve a bit to garnish bowls

INSTRUCTIONS

  1. In a large heavy-bottom pot, add 1 tablespoon butter, the diced onion, and sauté over medium heat until the onion is soft and translucent, about 4 minutes.

  2. Add the garlic and cook about 30 seconds. Using a spoon, scoop the onion and garlic mixture from the pot onto a plate and set aside.

  3. In the same pot add 4 tablespoons butter, flour, and cook over medium heat for about 3 to 5 minutes, whisking constantly, until flour is thickened. this is called a roux and it’s a very important step do not skip or soup will not reach the desired thickness.

  4. Continue whisking and slowly add the vegetable stock. and repeat this process for the half-and-half cream.

  5. Stop whisking, and allow the mixture to simmer (not boil) over low heat for about 15 to 20 minutes.

  6. While mixture is simmering, chop the broccoli and carrots. After simmering 15 to 20 minutes, add the broccoli, carrots, the onion and garlic to the pot, mix to incorporate.

  7. Add the salt, pepper, paprika, dry mustard powder, and cayenne (if you are using it). Stir to combine.

  8. Stirring intermittently, while simmering soup over low heat for about 20 minutes, or until it has reduced and thickened.

  9. While soup simmers, grate the aged cheddar cheese. Do not use pre-grated cheese in zip top bags because that cheese is resistant to melting and will change the texture and taste of the soup. After 20 minutes, add grated cheese, reserving a small amount for garnishing the bowls when serving. Give the soup a couple of stirs, the cheese will melt in and transfer soup to bowls, garnish with reserved cheese, and serve immediately.

RECIPE NOTES AND TIPS

  • Store soup in an airtight container for 5 to 7 days in the fridge.

  • Milk alternative, whole milk or 2% milk will work but soup won’t be as creamy.

  • I recommend using fresh broccoli, but if you are tight on time a bag of frozen broccoli florets will work.

  • Keep this soup vegetarian by using vegetable broth in place of the chicken broth and milk alternative in place of the cream.

TOOLS I USED IN THIS RECIPE

Whisk | Heavy Bottom Pot | Wooden Spoon | Soup Bowls | Ladle | Box Grater

Print Friendly and PDF

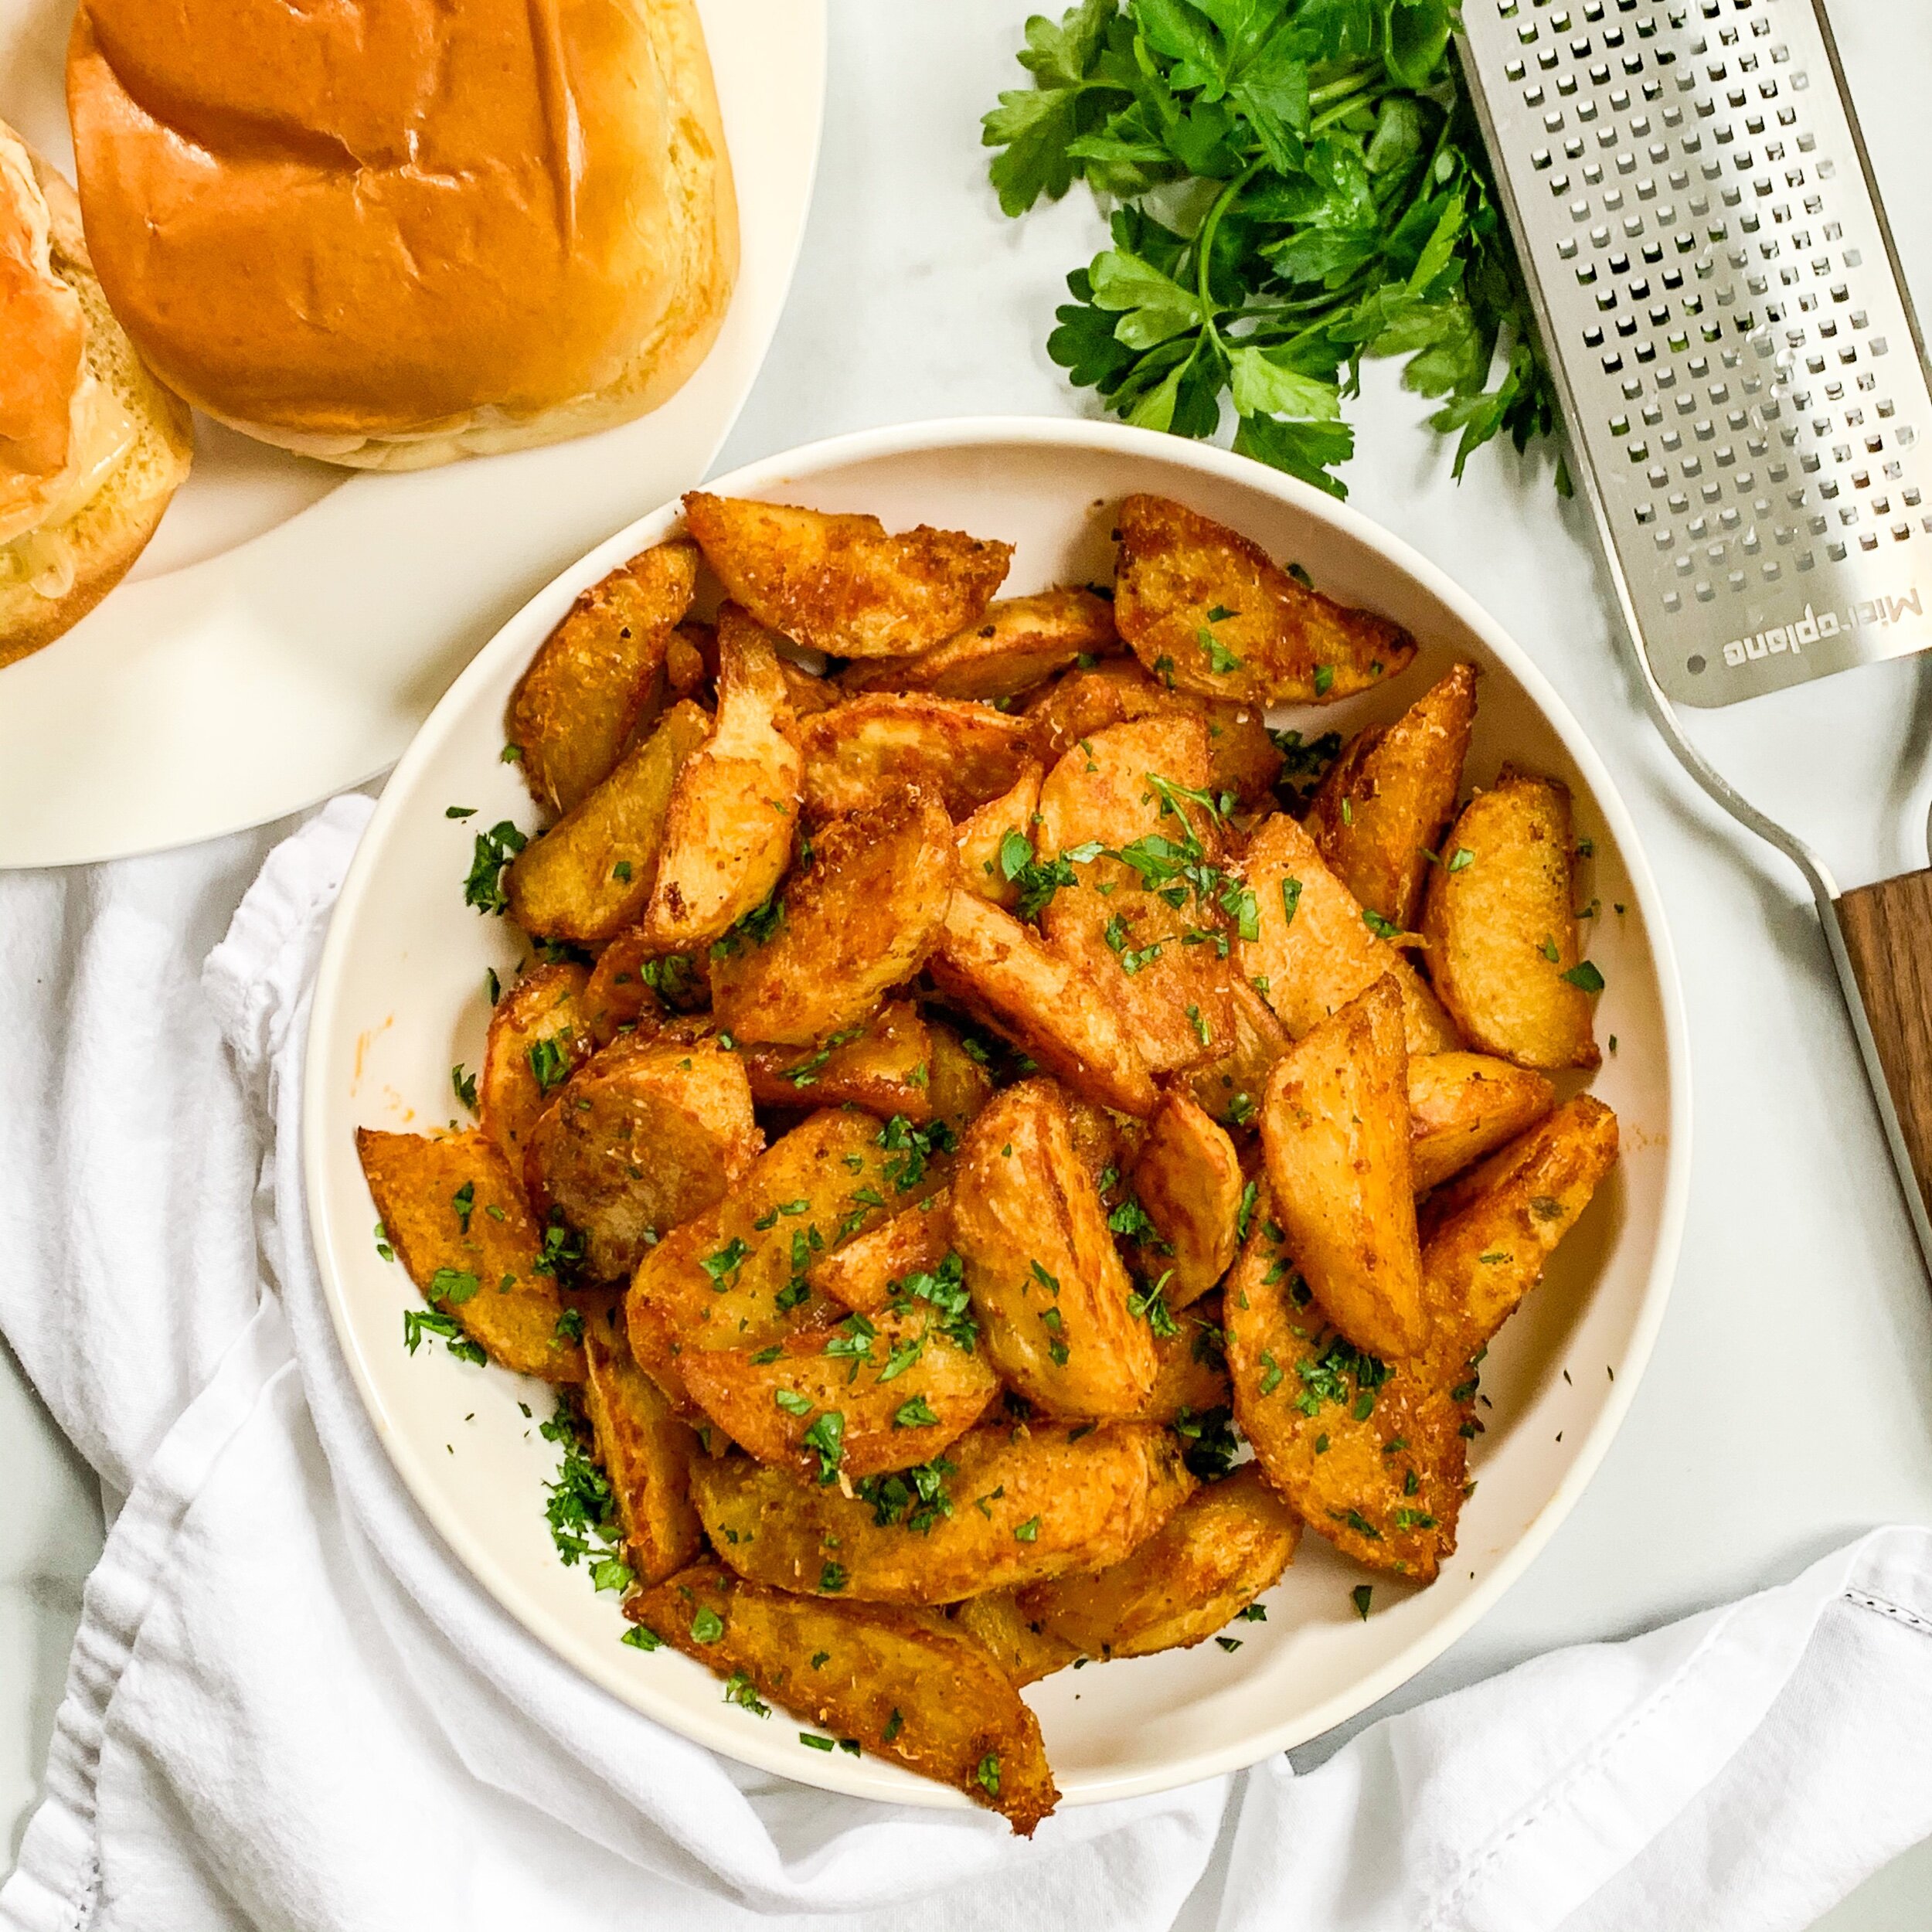
Recipe: Crispy Oven Roasted Garlic Potato Wedges

What if I said this was the BEST Roasted Potato Recipe and the only one you will ever need. Would you believe me?

If you said no, it’s okay I’ll change your mind by the end of this post. These potatoes are perfect mix of soft and creamy on the inside, crunchy and salty on the outside with a hint of garlic and Parmesan on the outside.

Stay with me here. You can add them as a trusty side, make a spicy aioli dip and serve them as appetizers or grab a plate and have them as a snack.

Still on the fence? Just make them, and try for yourself. I guarantee you and the family will love them.

IMG_2001.jpeg

Crispy Oven Roasted Garlic Potato Wedges

Prep Time: 15 minutes 
Cook Time: 35 minutes 
Total Time: 50 minutes 
Serves: 6
Author: Mary Mammoliti / Kitchen Confession 

INGREDIENTS

  • 6 large yellow potatoes, peeled and rinsed

  • 1/4 cup olive oil

  • 1 tablespoon minced garlic, (or 3 teaspoons garlic powder)

  • 1/2 teaspoon onion powder

  • 2 teaspoons sea salt

  • 1 teaspoon paprika

  • Fresh cracked black pepper to taste

  • 2/3 cup finely grated parmegiano reggiano cheese, divided

  • 2 tablespoons chopped fresh parsley

INSTRUCTIONS

  1. Preheat oven to 390°F (200°C). Line 2 large baking sheets with parchment paper; set aside.

  2. Cut each potato in half lengthways, then cut each half in half lengthways again, and then cut each half in half lengthways again until you have 8 wedges. (Make sure they are about the same thickness and size). 

  3. In a large bowl, add the cut potatoes, oil, garlic, onion powder, salt, paprika and pepper and toss to coat. 

  4. Arrange potato wedges in a single layer on a large baking tray. Sprinkle with half of the parmesan cheese. 

  5. Bake for 35 minutes, turning wedges half way through baking time, until golden, crisp and cooked through when tested with a fork.

  6. Sprinkle with parsley. OPTIONAL: Sprinkle remaining parmesan cheese to serve.

Print Friendly and PDF

Recipe: Sausage & Veggie Sheet Pan Dinner

When you look up the word “Easy” you’ll see a picture of me. WAIT! I didn’t think that through. What I’m trying to say is I’m all about easy and simple meals. No one has time or patience to spend hours after work making dinner. This is when you pull out this recipe for my Sausage & Veggie Sheet Pan Dinner. You’ll have dinner on the table in less than 40 minutes!

All you need for this savoury flavour packed meal are 3 ingredients, one sheet pan and a helper to pour a glass of wine, dinner is served. If you use the time to tidy up while your meal is roasting up in the oven you can probably even have your pj’s on before 7pm and that are what dreams are made of.

Buon Appetito and if you give this recipe a try let me know how it goes. I love hearing for you all. xo’s Mary

IMG_2176.jpeg

Roasted Italian Sausage & Veggie Sheet Pan Dinner

PREP TIME: 10 minutes 
COOK TIME: 30 minutes 
TOTAL TIME: 40 minutes 
SERVINGS: 4
AUTOR: Mary Mammoliti / Kitchen Confession

Quick and easy one-dish dinner perfect for busy weeknights!


INGREDIENTS 

4 links chicken sausages, cut into 2" pieces (you can substitute for Italian sausage)
1 pound Brussels sprouts, halved
1 pound sweet potato, cut into 3/4" chunks
1/4 cup extra virgin oil
zest of 1 lemon (optional
2 cloves garlic, minced
1 teaspoon dry parsley
1 teaspoon sea salt
1/2 teaspoon freshly ground black pepper

INSTRUCTIONS 

  1. Preheat oven to 400 degrees. Line a baking sheet with foil. Toss the sausage, sprouts, and sweet potato on the baking sheet and set aside.

  2. Whisk together the olive oil, lemon zest, garlic, parsley, salt, and pepper. Drizzle over the sausage/sprouts/sweet potato mixture. Toss to combine.

  3. Place the sheet pan in the oven and bake for 15 minutes, then use a spoon to gently mix the sausage mixture and bake for another 10-15 minutes.


Print Friendly and PDF

Recipe: Roasted Italian Sausage & Veggie Sheet Pan Dinner

Have you heard of sheet pan dinners? If you haven’t, make this Roasted Italian Sausage & Veggie Sheet Pan Dinner be your introduction. Tossing everything onto one pan is literally the easiest way to make dinner. Not only are they easy to make, it makes clean up a breeze. Spoiler Alert! I’ve added a special ingredient for a hint of sunshine in this cozy dish. Can you guess what it could be?

IMG_9544.JPG

 Roasted Italian Sausage & Veggie Sheet Pan Dinner

This is one of my favourite meals and a great addition to meal prep days. It’s quick, easy and it fits all in one sheet pan making it perfect for busy weeknights!

 PREP TIME: 15 minutes
COOK TIME: 30 minutes
TOTAL TIME: 45 minutes
SERVINGS: 4

INGREDIENTS 

  • 4 links Italian sausages, cut into 2" pieces (you can substitute for chicken sausage)

  • 1 pound brussels sprouts, halved

  • 1 pound mini potatoes, cut into quarters

  • 2 medium size carrots, peeled and cut into 2” pieces

  • 1 large parsnip, peeled and cut into 2” pieces

  • 1/4 cup extra virgin oil

  • zest of 1 lemon

  • 1 1/2 teaspoons garlic powder

  • 1 1/2 teaspoons onion powder

  • 1 teaspoon dried parsley

  • 1/2 teaspoon dried oregano

  • 1/4 teaspoon dried thyme

  • 1 teaspoon sea salt

  • 1/2 teaspoon freshly ground black pepper

INSTRUCTIONS 

  1. Preheat oven to 400 degrees. Line a baking sheet with foil. Toss the sausage, sprouts, carrots, and parsnips on the baking sheet and set aside.

  2. Whisk together the olive oil, lemon zest, garlic powder, onion powder, parsley, oregano, thyme, salt, and pepper. Drizzle over the sausage and veggie mixture. Toss to combine.

  3. Place the sheet pan in the oven and bake for 15 minutes, then use a spoon to gently mix the sausage mixture and bake for another 15 minutes or until veggies are tender.


Print Friendly and PDF

Recipe: Crunchy Honey Almond Granola

Good morning from the KC kitchen!

I hope you are all having a great start to your day. 

My morning began with this bowl of Greek Yogurt and a handful (or 2, who’s really counting) of this CRUNCHY HONEY ALMOND GRANOLA followed by an interesting chat with the inspiring founder of The Grange of Prince Edward Winery Caroline Granger - get ready KC Podcasters for a new episode coming your way. It’s going to be

In the mean time scoop out a few spoonfuls of vanilla creamy greek yogurt and a handful of this Honey Almond Granola. Sit back and enjoy every scoop :)

Photo Description: a bowl filled with vanilla greek yogurt topped with crunchy honey almond granola, a gold spoon, and a glass storage container filled with the freshly made granola

Photo Description: a bowl filled with vanilla greek yogurt topped with crunchy honey almond granola, a gold spoon, and a glass storage container filled with the freshly made granola

Did I mention if you subscribe to the Kitchen Confession Podcast on any podcast platform the episode will automatically download and ready for you to listen to at any time. It’s that easy! SUBSCRIBE and help us keep doing what we love to do and bring you more of what’s going on in the world of FOOD & BEVERAGE ~ sending you all xoxoxo ❤️


Shop everything in this pic with the LIKEtoKNOW.it app! Follow me for direct links to these products and much more!


CRUNCHY HONEY ALMOND GRANOLA

Only 6 ingredients and easy to make. It’s gluten free, healthy and crazy delicious! Pinch me, I think I’m dreaming - NOPE THIS IS THE REAL DEAL! 

Photo Description: a bowl filled with vanilla greek yogurt topped with crunchy honey almond granola, a gold spoon, and a glass storage container filled with the freshly made granola

Photo Description: a bowl filled with vanilla greek yogurt topped with crunchy honey almond granola, a gold spoon, and a glass storage container filled with the freshly made granola

PREP TIME: 10 minutes
COOK TIME: 22 minutes
TOTAL TIME: 32 minutes
SERVINGS: As many bowls as you see fit :)
AUTHOR: Mary Mammoliti | Kitchen Confession

Ingredients

3 1/2 cups rolled oats (use gluten free if you have a gluten sensitivity)
1 cup whole almonds, roughly chopped
1/2 cup pure honey
1/4 cup grapeseed oil (any neutral oil will work like canola)
3 teaspoons vanilla
1/4 teaspoon fine sea salt

Instructions

  1. Preheat oven to 350 degrees F and line a baking sheet with parchment paper.

  2. Roughly chop the whole almonds.

  3. In a large mixing bowl add the rolled oats and almonds and stir to combine.

  4. In a smaller microwave-safe bowl add the honey, oil, vanilla and salt and microwave for about 30 seconds until just warm and the honey and oil mix easily.

  5. Pour the warm honey mixture over the oats and stir until the mixture is coated.

  6. Transfer the oat mixture to the prepared baking sheet and spread into an even layer. Bake for 20-22 minutes or until golden brown being sure to stir the granola after 15 minutes and again at 20 minutes. If you need the extra 2 minutes stir again before placing the tray back in the oven.

  7. Allow granola to cool completely on the baking sheet before storing in an airtight container. This granola keeps for about a week - if it lasts that long :)

  8. Do NOT refrigerate


Print Friendly and PDF

Recipe: Breakfast Hash in 30 Minutes!

I thought I would bring you a little BREAKFAST HASH on this gorgeous sunny morning. Not only does it taste fantastic, this nutrient packed meal clocks in at 30 minutes total cook time! Oh YAAAASSSSSSS! AND don’t forget to include this simple and easy meal to your weekly meal prep recipe box. This recipe should take centre stage on every brunch table, and serve it directly from the baking sheet - family style. Honestly, this quick and simple meal will tantalize your tastebuds, warm your belly, and have you dancing all the way to the kitchen sink when you're done. It's THAT GOOD! 

This dish surpassed all EGG-spectations!  I'm curious, do you hate or love eggs? Sunny side up or scrambled? Comment below and let me know what makes you egg-static about eggs. You all know how much I love a good pun :) 

Photo Description: 1 Pan dinner-large rimmed baking sheet filled with diced sweet potatoes, red bell pepper, broccoli florets, sweet corn, black beans and 6 single sunny side up eggs baked on top of the veggies

Photo Description: 1 Pan dinner-large rimmed baking sheet filled with diced sweet potatoes, red bell pepper, broccoli florets, sweet corn, black beans and 6 single sunny side up eggs baked on top of the veggies

Breakfast Hash

PREP TIME: 5 minutes
COOK TIME: 25 minutes
TOTAL TIME: 30 minutes
SERVES: 3 large or 6 small
AUTHOR: Mary Mammoliti / Kitchen Confession

INGREDIENTS

2 medium sweet potatoes, peeled and diced (Read Tips below for size)
1 head of broccoli, florets
1 medium red bell pepper, diced
1 (15-ounce) can black beans, drained and rinsed
1 cup frozen corn kernels
3 tablespoons olive oil
2 cloves garlic, minced
1 teaspoon chili powder
1/2 teaspoon ground cumin
1/2 teaspoon smoked paprika
Salt and pepper to taste
Olive Oil, to coat the sheet pan
6 large eggs

DIRECTIONS

  • Adjust your oven rack in the middle of the oven and heat to 425°F. With a little olive oil lightly coat a rimmed baking sheet.

  • Place the sweet potatoes, broccoli florets, bell pepper, black beans, and corn in a single layer on the prepared baking sheet. Add the 3 tablespoons olive oil, garlic, chili powder, cumin, and paprika. Season with salt and pepper and gently toss to combine.

  • Bake for 15 to 18 minutes stirring halfway through, until the sweet potatoes are tender. Remove the pan from the oven and create 6 wells in the vegetables. Gently crack an egg into each well, keeping the yolk intact; season the eggs with salt and pepper.

  • Return the pan to the oven and bake 7 to 9 minutes, or until the egg whites have set.

  • Enjoy!

TIPS: 

You can enjoy this dish immediately or portion it out into your to-go containers and pack it up and you have breakfast for the week. 

When chopping your veggies, try and cut them to bite size pieces and keep them roughly the same size to ensure even cooking throughout your dish. 

To make this dish even easier, buy pre-cut vegetables from you local grocery store and cut back even more on your prep time.

The olive oil can be substituted out for avocado oil or grape seed oil if you prefer. 

Leftovers can be stored in an airtight container and refrigerated for up to 5 days.

Print Friendly and PDF

Recipe: 5 Ingredient Protein Pancakes

Who said you can’t Meal Prep pancakes? This post is proof that you can. These simple 5 Ingredient Protein Pancakes will quickly become a staple in your meal prep rotation. These pancakes are loaded with protein, high in fiber and healthy fats to keep you energized all morning long! This recipe makes 7 servings of 4 pancakes per serving. Too many servings? Freeze them. Now get your griddle ready and get your flap jack on!

Photo Description: 4 round pancakes in a rectangle container with sliced strawberries, small round container of syrup with a knife and fork to the right of the container

Photo Description: 4 round pancakes in a rectangle container with sliced strawberries, small round container of syrup with a knife and fork to the right of the container

5 Ingredient Protein Pancakes

PREP TIME: 10 minutes
COOK TIME:  10 - 15 minutes
TOTAL TIME: 25 minutes
SERVES: 7 (4 Pancakes per serving)
AUTHOR: Mary Mammoliti | Kitchen Confession

INGREDIENTS

1 cup coconut flour
2 scoops vanilla protein powder
1/4 cup coconut oil, melted
8 large eggs
1 1/2 cups unsweetened almond milk (or milk of your choice) 

Toppings: 

Fresh berries
Pure maple syrup

DIRECTIONS

  1. In a medium bowl, combine all ingredients until a smooth creamy mixture forms

  2. Using a 2 tbs size measuring spoon, scoop batter batter onto a non stick or lightly oiled skillet over medium/low heat

  3. Repeat until all batter is finished

  4. Evenly divide between containers with 1/2 cup sliced strawberries

  5. Top with maple syrup just before eating and enjoy!

NOTES

  • Each serving (4 Pancakes) without toppings is packed with 17.4g of Protein, 11.4g Carbs and 5.9g Fiber

  • The absorbency of coconut flour may vary by brand resulting in a dry mixture with a thick consistency. To remedy this issue add a little extra coconut oil and/or milk of choice.

Print Friendly and PDF