Recipe: Lemony Fresh Orzo Salad

To quote my nieces and nephew “FOMO is real” and I couldn’t agree more. It’s been so grey and rainy here in Toronto that I’m missing the sunshine. Where is it?  I bet it’s at a party! Did I miss the invite? Why hasn’t it been around? GHAAAA! I can’t take this! Let me check @instagram. I’m missing out on something great! Maybe. Umm, probably not. Who knows where it is and what it’s doing I just miss it and decided to stop obsessing. I’m taking matters into my own hands.  Did you know that adding lemon to just about any dish will give you instant sunshine? 

Give this beauty a try and let me know if it brightens up your day.

IMG_7930.jpeg

Lemony Fresh Orzo Salad

TOTAL TIME: 30 MINS
PREP TIME: 15 MINS
COOK TIME: 15 MINS
AUTHOR: Mary Mammoliti / Kitchen Confession

INGREDIENTS:

  • 12 ounces uncooked orzo

  • 2 large handfuls fresh arugula, chopped

  • 1 (15-ounce) can chickpeas (garbanzo beans), rinsed and drained

  • 1 English cucumber, diced

  • 1 cup frozen corn, thawed

  • 1 cup roughly-chopped fresh basil leaves

  • 1/2 head radicchio, roughly-chopped fresh

Lemony Dressing:

  • 2 lemons, juiced

  • 1 tablespoon rice wine or white vinegar

  • 1/2 tablespoon Dijon mustard

  • 1 garlic clove, finely minced

  • 1/2 cup olive oil

  • 1 teaspoon sea salt and freshly-cracked black pepper, to taste

  • optional: 1/2 cup crumbled feta or goat cheese

DIRECTIONS:

  1. Cook the pasta in a large stockpot of generously-salted water until al dente, according to package instructions.  Drain pasta then rinse thoroughly in a strainer with cold water until the pasta is chilled.  Transfer to a large mixing bowl.

  2. Add all the lemony dressing ingredients to a medium sized bowl and whisk for 1-2 minutes, or until the dressing begins to look creamy. Set aside.

  3. Add the remaining ingredients to the mixing bowl. , pour dressing over and toss to combine.  Taste, and season with extra salt and pepper, if needed.

  4. Serve immediately.  Or cover and refrigerate for up to 3 days.

NOTE:

If you do not use all the dressing store in a sealed jar in your fridge for up to one week.

Print Friendly and PDF

Recipe: Quick and Easy Pickled Red Onions

Pickled Red Onion are life changing! Dramatic? Nah. Exaggerating? Nope. It’s just plain old love for the red onion. I can go on and list all the countless uses for the pickled red onion but I’ll keep it to a few.Add them to your salads, top your tuna/mayo sandwich or as a side with rich meats like pulled pork, or smoked meats.

I choose the red onion because of it’s relatively mild flavour along with it’s gorgeous purple/pink colour (so pretty). The vinegar provides the tang and cuts the sharp onion flavour, the sugar adds a nice balance to the salty vinegar brine, and the water tampers the pungent and lingering aftertaste of raw onions. Adding additional flavours is optional like garlic, chili clacked, or herbs. I prefer to keep my pickled onions simple but you do you. Happy Pickling Peeps!

FullSizeRender.jpg

 Quick and Easy Pickled Red Onions

Prep time: 5 mins
Total time: 1 hour 5 mins
Serves: 1 litre jar
Author: Mary Mammoliti / Kitchen Confession | kitchenconfession.com


Ingredients

2 large red onions thinly sliced
1 cup white wine vinegar
2 tbsp sugar
2 tsp kosher salt
2 cups boiling water

Instructions

  1. Slice the onions: Start 2 cups of water to boil in a kettle. Peel and thinly slice the onion into approximately 1/4-inch moons (or thinner if you prefer)

  2. In a bowl, whisk vinegar and seasonings with 2 cups of boiling water until fully dissolved.

  3. Place onion slices into a 1 litre glass mason jar and pour the liquid mixture over until covered. perfectly for this.

  4. Let sit for at least 1 hour, but it is best if left in the refrigerator overnight.

Print Friendly and PDF

Recipe: Sausage & Veggie Sheet Pan Dinner

When you look up the word “Easy” you’ll see a picture of me. WAIT! I didn’t think that through. What I’m trying to say is I’m all about easy and simple meals. No one has time or patience to spend hours after work making dinner. This is when you pull out this recipe for my Sausage & Veggie Sheet Pan Dinner. You’ll have dinner on the table in less than 40 minutes!

All you need for this savoury flavour packed meal are 3 ingredients, one sheet pan and a helper to pour a glass of wine, dinner is served. If you use the time to tidy up while your meal is roasting up in the oven you can probably even have your pj’s on before 7pm and that are what dreams are made of.

Buon Appetito and if you give this recipe a try let me know how it goes. I love hearing for you all. xo’s Mary

IMG_2176.jpeg

Roasted Italian Sausage & Veggie Sheet Pan Dinner

PREP TIME: 10 minutes 
COOK TIME: 30 minutes 
TOTAL TIME: 40 minutes 
SERVINGS: 4
AUTOR: Mary Mammoliti / Kitchen Confession

Quick and easy one-dish dinner perfect for busy weeknights!


INGREDIENTS 

4 links chicken sausages, cut into 2" pieces (you can substitute for Italian sausage)
1 pound Brussels sprouts, halved
1 pound sweet potato, cut into 3/4" chunks
1/4 cup extra virgin oil
zest of 1 lemon (optional
2 cloves garlic, minced
1 teaspoon dry parsley
1 teaspoon sea salt
1/2 teaspoon freshly ground black pepper

INSTRUCTIONS 

  1. Preheat oven to 400 degrees. Line a baking sheet with foil. Toss the sausage, sprouts, and sweet potato on the baking sheet and set aside.

  2. Whisk together the olive oil, lemon zest, garlic, parsley, salt, and pepper. Drizzle over the sausage/sprouts/sweet potato mixture. Toss to combine.

  3. Place the sheet pan in the oven and bake for 15 minutes, then use a spoon to gently mix the sausage mixture and bake for another 10-15 minutes.


Print Friendly and PDF

Recipe: Easy Pork Tenderloin Sheet Pan Dinner

TGIF {Thank God It’s Food} TIME! 

It’s that time my friends, when we talk food. I know I’m a food blogger and I talk Food all day err day but today is different. I’m talking about cooking on a Friday (my kitchen free day) but this recipe was just too good not to make. Juicy, crispy, warm, satisfying, healthy and down right delicious. WAIT - almost forgot to mention it’s a ONE SHEET PAN MEAL - quick and simple to make using minimal ingredients. 

Whatcha still doing reading, get on your grocery delivery app or hop in the car and get the ingredients to make this EASY PORK TENDERLOIN SHEET PAN DINNER tonight BUT only after you show some love for this sheet pan goodness with a DOUBLE TAP and like the heck out of this recipe ❤️ 

~ loving you all, Buon Appetito  

IMG_1317.jpeg

EASY PORK TENDERLOIN SHEET PAN DINNER

Prep Time: 15 minutes 

Cook Time: 25 minutes 

Total Time: 40 minutes 

Author: Mary Mammoliti | Kitchen Confession 

INGREDIENTS

2 - 1 pound pork tenderloins, trimmed

1 pound green beans, stems trimmed

1 1/2 pounds baby potatoes cut in half lengthwise

3 tablespoons olive oil

kosher salt and freshly ground pepper

4 tablespoons unsalted butter softened

2 tablespoons finely chopped fresh chives

1 garlic clove minced

non stick cooking spray

Sauce

1/4 c molasses 

2 Tbsp + 1/2 tsp soy sauce 

2 Tbsp creamy peanut butter 

2 Tbsp rice vinegar or white wine vinegar 

1/2 tsp garlic powder 

1/2 tsp Sriracha 

1 1/2 tsp cornstarch + 1 1/2 tsp cold water

INSTRUCTIONS 

  1. Lower oven rack to middle lower position and preheat oven to 450 degrees F. Spray rimmed baking sheet with nonstick cooking spray or rub high temp oil using a paper towel to coat the baking sheet. 

  2. In a large bowl, combine green beans with 1 tablespoon of olive oil, 1/4 teaspoon of kosher salt and 1/4 teaspoon of freshly ground pepper. Arrange green beans in center of baking sheet. 

  3. In the same bowl, toss potatoes with 2 tablespoons of olive oil, 1/4 teaspoon of kosher salt and 1/4 teaspoon of freshly ground pepper. Transfer to baking sheet and arrange on either side of green beans, cut side down. 

  4. Lay tenderloins, not touching, over green beans 

  5. In a small saucepan, combine molasses, soy sauce, creamy peanut butter, rice vinegar or white wine vinegar, garlic powder, and Sriracha except cornstarch. Heat over medium heat until the molasses and peanut butter have dissolved. 

  6. In a small bowl, mix the cornstarch with 1 1/2 tsp cold water. Stir until the cornstarch has dissolved. 

  7. Increase the heat under the saucepan to medium-high and whisk in the cornstarch slurry. Simmer until the mixture begins to thicken, 1-2 min. Remove the sauce from the burner to cool. (The sauce will continue to thicken as it cools.

  8. Brush the sauce over each tenderloin, sprinkle lightly with salt and pepper. Roast for 20 to 25 minutes, or until thickest part of tenderloins reaches 140 degrees on a meat thermometer. 

  9. While tenderloin is roasting, combine butter, chives, garlic, 1/4 salt and 1/4 pepper. When tenderloin is done cooking, remove sheet pan and top each tenderloin with one tablespoon of garlic herb better and let pork tenderloin  rest before slicing.

  10. Top potatoes and green beans with remaining two tablespoon of garlic herb butter and serve.

Print Friendly and PDF

Recipe: Pasta é Fagioli

Today’s plans include serving up a bowl of this Pasta é Fagioli. I haven’t made this in years and to be honest I’m disappointed that I waited so long. I almost forgot how much this dish reminded me of my Dad - or did I? My Dad passed 9 years ago and up until this past year I haven’t been able to think of him without my eyes welling up. Maybe that’s why I haven’t made this dish, hmmm, was I avoiding feeling all the feels that come with losing him? Have I truly accepted the loss? Ugh! Maybe I’m over analyzing this. Whatever the reasons are I’m glad I finally made this dish. It was like a giant hug from my dad, warm and comforting.

The pot simmered as the aromas filled my kitchen and memories folding my thoughts. He was a man of very few words with a sense of humour that would make even the darkest of days brighter. It’s funny how a simple meal can trigger a rush of emotions and even help put unresolved feelings to rest. I guess it’s okay to feel the feels, mourn the loss of a loved one, friend, pet, illness whatever your struggling with at your own pace and don’t avoid feeling it because you may just miss out on the simplest joys of what life has to offer.

I know it’s a pretty deep post for Pasta é Fagioli but it’s amazing how healing food can really be. I hope you read this and find solace in knowing you are not alone and find strength in any struggle you my be facing today. It’s okay to feel all the feels, and take it easy on yourself. Life has a sweet way of surprising you. SMILE and Tag, call or text someone today and let them know you care. I’M TAGGING ALL OF YOU! ❤️

IMG_9692.JPG

 Pasta é Fagioli

PREP TIME: 20 min
COOK TIME: 30 min
TOTAL TIME: 50 min
SERVES: 6 - 8
AUTHOR: Mary Mammoliti / Kitchen Confession

INGREDIENTS

1 tablespoon olive oil
1 tablespoon unsalted butter
1/3 to 1/2 cup pancetta, diced
1 medium onion, diced (approximately 1 cup)
2 teaspoons minced garlic
2 medium carrots, peeled and diced
3 large potatoes, diced
4 cups tomato purée, preferably San Marzano tomatoes if you can get them)
1 cup Ditalini or elbow pasta
1/2 teaspoon dry thyme
1 teaspoon dry rosemary
1 teaspoon celery seeds
1 bay leaf
Salt and pepper to taste
5 cups low-sodium chicken broth
2 (14.5-ounce) cans 1 can red kidney beans and 1 can white kidney beans, drained and rinsed
3/4 cup elbow macaroni
Freshly ground black pepper
Pinch red pepper flakes, optional
Freshly grated parmigiano reggiano to sprinkle on top just before serving

INSTRUCTIONS

  1. Heat 1 tablespoon of olive oil and butter in a large heavy saucepan over medium heat. Add the onion, pancetta, and garlic and saute until the onion is tender, about 3 minutes. Add diced carrots, potatoes and continue cooking for an additional 2-3 minutes.

  2. Add the broth, tomato purée, beans, dried herbs, salt and pepper. Bring to a boil over high heat, then decrease the heat to medium and simmer until the vegetables are tender, about 10 minutes.

  3. Scoop out 1 cup of the bean mixture from the pot and 1/2 cup of the liquid and pour into a blender until smooth and set aside.

  4. Add the pasta to the pot and boil with the already cooked veggie mixture for 8 minutes until tender. Return the puree to the pot of soup and stir well. Season the soup with red pepper flakes for an added kick of heat.

  5. Serve warm with a sprinkle of freshly grated parmigiano reggiano


Print Friendly and PDF

Recipe: Roasted Italian Sausage & Veggie Sheet Pan Dinner

Have you heard of sheet pan dinners? If you haven’t, make this Roasted Italian Sausage & Veggie Sheet Pan Dinner be your introduction. Tossing everything onto one pan is literally the easiest way to make dinner. Not only are they easy to make, it makes clean up a breeze. Spoiler Alert! I’ve added a special ingredient for a hint of sunshine in this cozy dish. Can you guess what it could be?

IMG_9544.JPG

 Roasted Italian Sausage & Veggie Sheet Pan Dinner

This is one of my favourite meals and a great addition to meal prep days. It’s quick, easy and it fits all in one sheet pan making it perfect for busy weeknights!

 PREP TIME: 15 minutes
COOK TIME: 30 minutes
TOTAL TIME: 45 minutes
SERVINGS: 4

INGREDIENTS 

  • 4 links Italian sausages, cut into 2" pieces (you can substitute for chicken sausage)

  • 1 pound brussels sprouts, halved

  • 1 pound mini potatoes, cut into quarters

  • 2 medium size carrots, peeled and cut into 2” pieces

  • 1 large parsnip, peeled and cut into 2” pieces

  • 1/4 cup extra virgin oil

  • zest of 1 lemon

  • 1 1/2 teaspoons garlic powder

  • 1 1/2 teaspoons onion powder

  • 1 teaspoon dried parsley

  • 1/2 teaspoon dried oregano

  • 1/4 teaspoon dried thyme

  • 1 teaspoon sea salt

  • 1/2 teaspoon freshly ground black pepper

INSTRUCTIONS 

  1. Preheat oven to 400 degrees. Line a baking sheet with foil. Toss the sausage, sprouts, carrots, and parsnips on the baking sheet and set aside.

  2. Whisk together the olive oil, lemon zest, garlic powder, onion powder, parsley, oregano, thyme, salt, and pepper. Drizzle over the sausage and veggie mixture. Toss to combine.

  3. Place the sheet pan in the oven and bake for 15 minutes, then use a spoon to gently mix the sausage mixture and bake for another 15 minutes or until veggies are tender.


Print Friendly and PDF

Recipe: Crunchy Honey Almond Granola

Good morning from the KC kitchen!

I hope you are all having a great start to your day. 

My morning began with this bowl of Greek Yogurt and a handful (or 2, who’s really counting) of this CRUNCHY HONEY ALMOND GRANOLA followed by an interesting chat with the inspiring founder of The Grange of Prince Edward Winery Caroline Granger - get ready KC Podcasters for a new episode coming your way. It’s going to be

In the mean time scoop out a few spoonfuls of vanilla creamy greek yogurt and a handful of this Honey Almond Granola. Sit back and enjoy every scoop :)

Photo Description: a bowl filled with vanilla greek yogurt topped with crunchy honey almond granola, a gold spoon, and a glass storage container filled with the freshly made granola

Photo Description: a bowl filled with vanilla greek yogurt topped with crunchy honey almond granola, a gold spoon, and a glass storage container filled with the freshly made granola

Did I mention if you subscribe to the Kitchen Confession Podcast on any podcast platform the episode will automatically download and ready for you to listen to at any time. It’s that easy! SUBSCRIBE and help us keep doing what we love to do and bring you more of what’s going on in the world of FOOD & BEVERAGE ~ sending you all xoxoxo ❤️


Shop everything in this pic with the LIKEtoKNOW.it app! Follow me for direct links to these products and much more!


CRUNCHY HONEY ALMOND GRANOLA

Only 6 ingredients and easy to make. It’s gluten free, healthy and crazy delicious! Pinch me, I think I’m dreaming - NOPE THIS IS THE REAL DEAL! 

Photo Description: a bowl filled with vanilla greek yogurt topped with crunchy honey almond granola, a gold spoon, and a glass storage container filled with the freshly made granola

Photo Description: a bowl filled with vanilla greek yogurt topped with crunchy honey almond granola, a gold spoon, and a glass storage container filled with the freshly made granola

PREP TIME: 10 minutes
COOK TIME: 22 minutes
TOTAL TIME: 32 minutes
SERVINGS: As many bowls as you see fit :)
AUTHOR: Mary Mammoliti | Kitchen Confession

Ingredients

3 1/2 cups rolled oats (use gluten free if you have a gluten sensitivity)
1 cup whole almonds, roughly chopped
1/2 cup pure honey
1/4 cup grapeseed oil (any neutral oil will work like canola)
3 teaspoons vanilla
1/4 teaspoon fine sea salt

Instructions

  1. Preheat oven to 350 degrees F and line a baking sheet with parchment paper.

  2. Roughly chop the whole almonds.

  3. In a large mixing bowl add the rolled oats and almonds and stir to combine.

  4. In a smaller microwave-safe bowl add the honey, oil, vanilla and salt and microwave for about 30 seconds until just warm and the honey and oil mix easily.

  5. Pour the warm honey mixture over the oats and stir until the mixture is coated.

  6. Transfer the oat mixture to the prepared baking sheet and spread into an even layer. Bake for 20-22 minutes or until golden brown being sure to stir the granola after 15 minutes and again at 20 minutes. If you need the extra 2 minutes stir again before placing the tray back in the oven.

  7. Allow granola to cool completely on the baking sheet before storing in an airtight container. This granola keeps for about a week - if it lasts that long :)

  8. Do NOT refrigerate


Print Friendly and PDF

Recipe: The Only Mac and Cheese Recipe You Need

This one pot recipe is so quick and easy you won’t know what to do with yourself with all the extra time you saved on dinner! On this weeks Kelly and Company I talked about Fall comfort food and shared my top picks along with a few surprising ingredients to take your dish downtown to flavour town! Topping that list is Mac and Cheese.

It’s cheese, pasta, milk, and butter which in my language means Love BUT just when you thought it couldn’t get any better try adding powered mustard. Add in a teaspoon to the cheesy sauce while it’s hot stir and add macaroni. Be prepared for a party in your mouth!

NOTE: Don’t expect to get an overwhelming mustard taste. The acidity cuts some of the creaminess of the mac and cheese and rounds out the flavour. It also adds a slight tang that I think adds a little character to the dish.

Photo Description: whitebowl filled with creamy, cheesy, Mac and Cheese

Photo Description: whitebowl filled with creamy, cheesy, Mac and Cheese

 Stovetop Mac and Cheese

PREP TIME: 5 MINS
COOK TIME:
15 MINS
TOTAL TIME:
20 MINS
Serves:
6-8
Author:
Mary Mammoliti | Kitchen Confession


INGREDIENTS

2 tablespoons butter
2 tablespoons flour
3 cups water
4 cups milk
1 pound uncooked pasta (cavatappi)
1 teaspoon sea salt
1/2 teaspoon garlic powder
1/2 teaspoon ground mustard
4-5 cups freshly-grated sharp white cheddar cheese
1/2 cup freshly grated parmigiano reggiano cheese (optional)


INSTRUCTIONS

  • Melt butter in a large stockpot over medium-high heat. Add flour, and stir until combined. Cook for 1 minute, stirring occasionally. Then pour in 1 cup of the water, and whisk until the mixture is completely smooth and begins to thicken. Gradually pour in the remaining water and milk, stirring until evenly combined.

  • Stir in the pasta, salt, garlic powder, and mustard until combined. Then continue cooking, stirring occasionally, until the mixture begins to simmer.

  • Grating your cheese while the pasta cooks to save time and set aside.

  • Reduce heat to medium-low and continue cooking, stirring occasionally, for about 9-10 minutes, or until the pasta is al dente.

  • Remove from heat, and stir in the cheese until melted. Taste, and season with additional salt and black pepper, if needed.

  • Serve immediately, and enjoy hot

TIPS: Always use block cheese for this recipe, and then grate them at home.  Try not to use pre shredded bags of cheese. They have less flavour and don’t melt as nicely as grating your own.

CHEESE SWAPS: Half-cheddar, half-fontina, or gouda, or havarti if you would like a creamier mac and cheese.

Print Friendly and PDF

Recipe: The Best Cranberry Sauce

This is probably the best and easiest Cranberry Sauce you will ever make. It’s Thanksgiving and as always my family and I give thanks and reminisce about Thanksgiving pasts - but today a bomb shell of truth was dropped directly on me.

Let’s begin by transporting you back to when I was 10-ish, and seated at a table covered in plates of food served family style. My dad at the head of the table, my brothers, sister and I settled on either side while my mom carried over this glorious golden bird. Could this be?

“We’re having turkey.” I mumbled under my breath.

“Maria, did you say something?”

“Is this turkey?” I asked, and a unanimous YES was the response around the table. .

YES! Thanksgiving Turkey - or that’s what I was lead to believe. TODAY I find out it was chicken! (Insert gasp here) CHICKEN! That means I didn’t have turkey until my early 20’s, I know, mind blown! .

This question goes out to all the PARENTS OUT THERE. What untruths have you told your children just so they would eat? Let’s see a show of hands in the comments.

Using only three ingredients, this jewel-toned side will give your main a run for the star of the meal.

Happy Thanksgiving to all! 


FullSizeRender.jpg

The Best Cranberry Sauce

Prep Time:  5 minutes 

Cook Time: 7 - 10 minutes 

Total Time: 15 minutes 

Serves:  8

Author: Mary Mammoliti | Kitchen Confession  

I N G R E D I E N T S

1 orange

1 (12-oz.) bag cranberries

¾ cup sugar

D I R E C T I O N S

Using a vegetable peeler, remove the zest from the orange. Thinly slice the zest and add it to a medium pot along with the sugar, ½ the bag of cranberries and ¼ cup water. Cook this over medium heat, stirring with a spoon until the cranberries have burst and it looks all jammy and wonderful, about 5 minutes. Add the other half of the cranberries and the chopped orange and keep cooking until the cranberries you just added start to burst, about 2 minutes. Remove from the heat and transfer this mixture to a serving bowl (or, an airtight container if you're making it in advance and refrigerate  

MAKE AHEAD

You can make this cranberry sauce five days in advance. The longer it sits the richer the flavour. Place in an airtight container and refrigerate. Give it a quick stir before serving.

Print Friendly and PDF

Recipe: Creamy Cauliflower Garlic Mash

Comment below if you love mashed potatoes!

What if I told you this wasn’t mashed potatoes. What if I said this warm plate of creamy garlic mash was actually made of cauliflower. Would you try it? Before you rethink your decision, give this recipe a try. Have a heaping spoon with some braised short ribs, or add it as a side with your Thanksgiving feast and lighten things up.

WARNING: Following the consumption of this Cauliflower Garlic Mash there may be sudden outbursts of joy, excessive smiling, and out of control requests for more.

Photo Description: Creamy Cauliflower Garlic Mash in a square serving dish on top of a white fringe cloth and 2 sunflowers in the bottom left corner.

Photo Description: Creamy Cauliflower Garlic Mash in a square serving dish on top of a white fringe cloth and 2 sunflowers in the bottom left corner.

Creamy Cauliflower Garlic Mash

 PREP TIME: 15 minutes
Cook TIME:
15 minutes
TOTAL TIME:
30 minutes
SERVES: 4
AUTHOR:
Mary Mammoliti / Kitchen Confession

INGREDIENTS

1 large head of cauliflower, cut into florets
4 cups chicken broth
4 cups water (more if needed to cover florets)
1 tablespoon unsalted butter
3 tablespoons extra virgin olive oil
2 large garlic cloves, minced
¼ cup 2% milk
salt and black pepper to taste

DIRECTIONS

  1. Place the cauliflower florets in to a large stock pot and cover with the chicken broth and water. Cook for 8-12 minutes or until fork tender. Drain and keep the in the colander and move onto next steps. You want to get as much water as possible out of the cauliflower.

  2. Pour the olive oil into the stock pot and sauté the garlic until fragrant. Remove from heat and return the cooked cauliflower back into the stock pot, add milk and butter. Using an emersion blender purée until smooth and creamy. Taste for salt and pepper.

  3. Garnish with chopped parsley, drizzle extra virgin olive oil over top and serve warm.

NOTES

Refrain from adding additional butter and/or milk to the mash, it will thin out too much.

Print Friendly and PDF

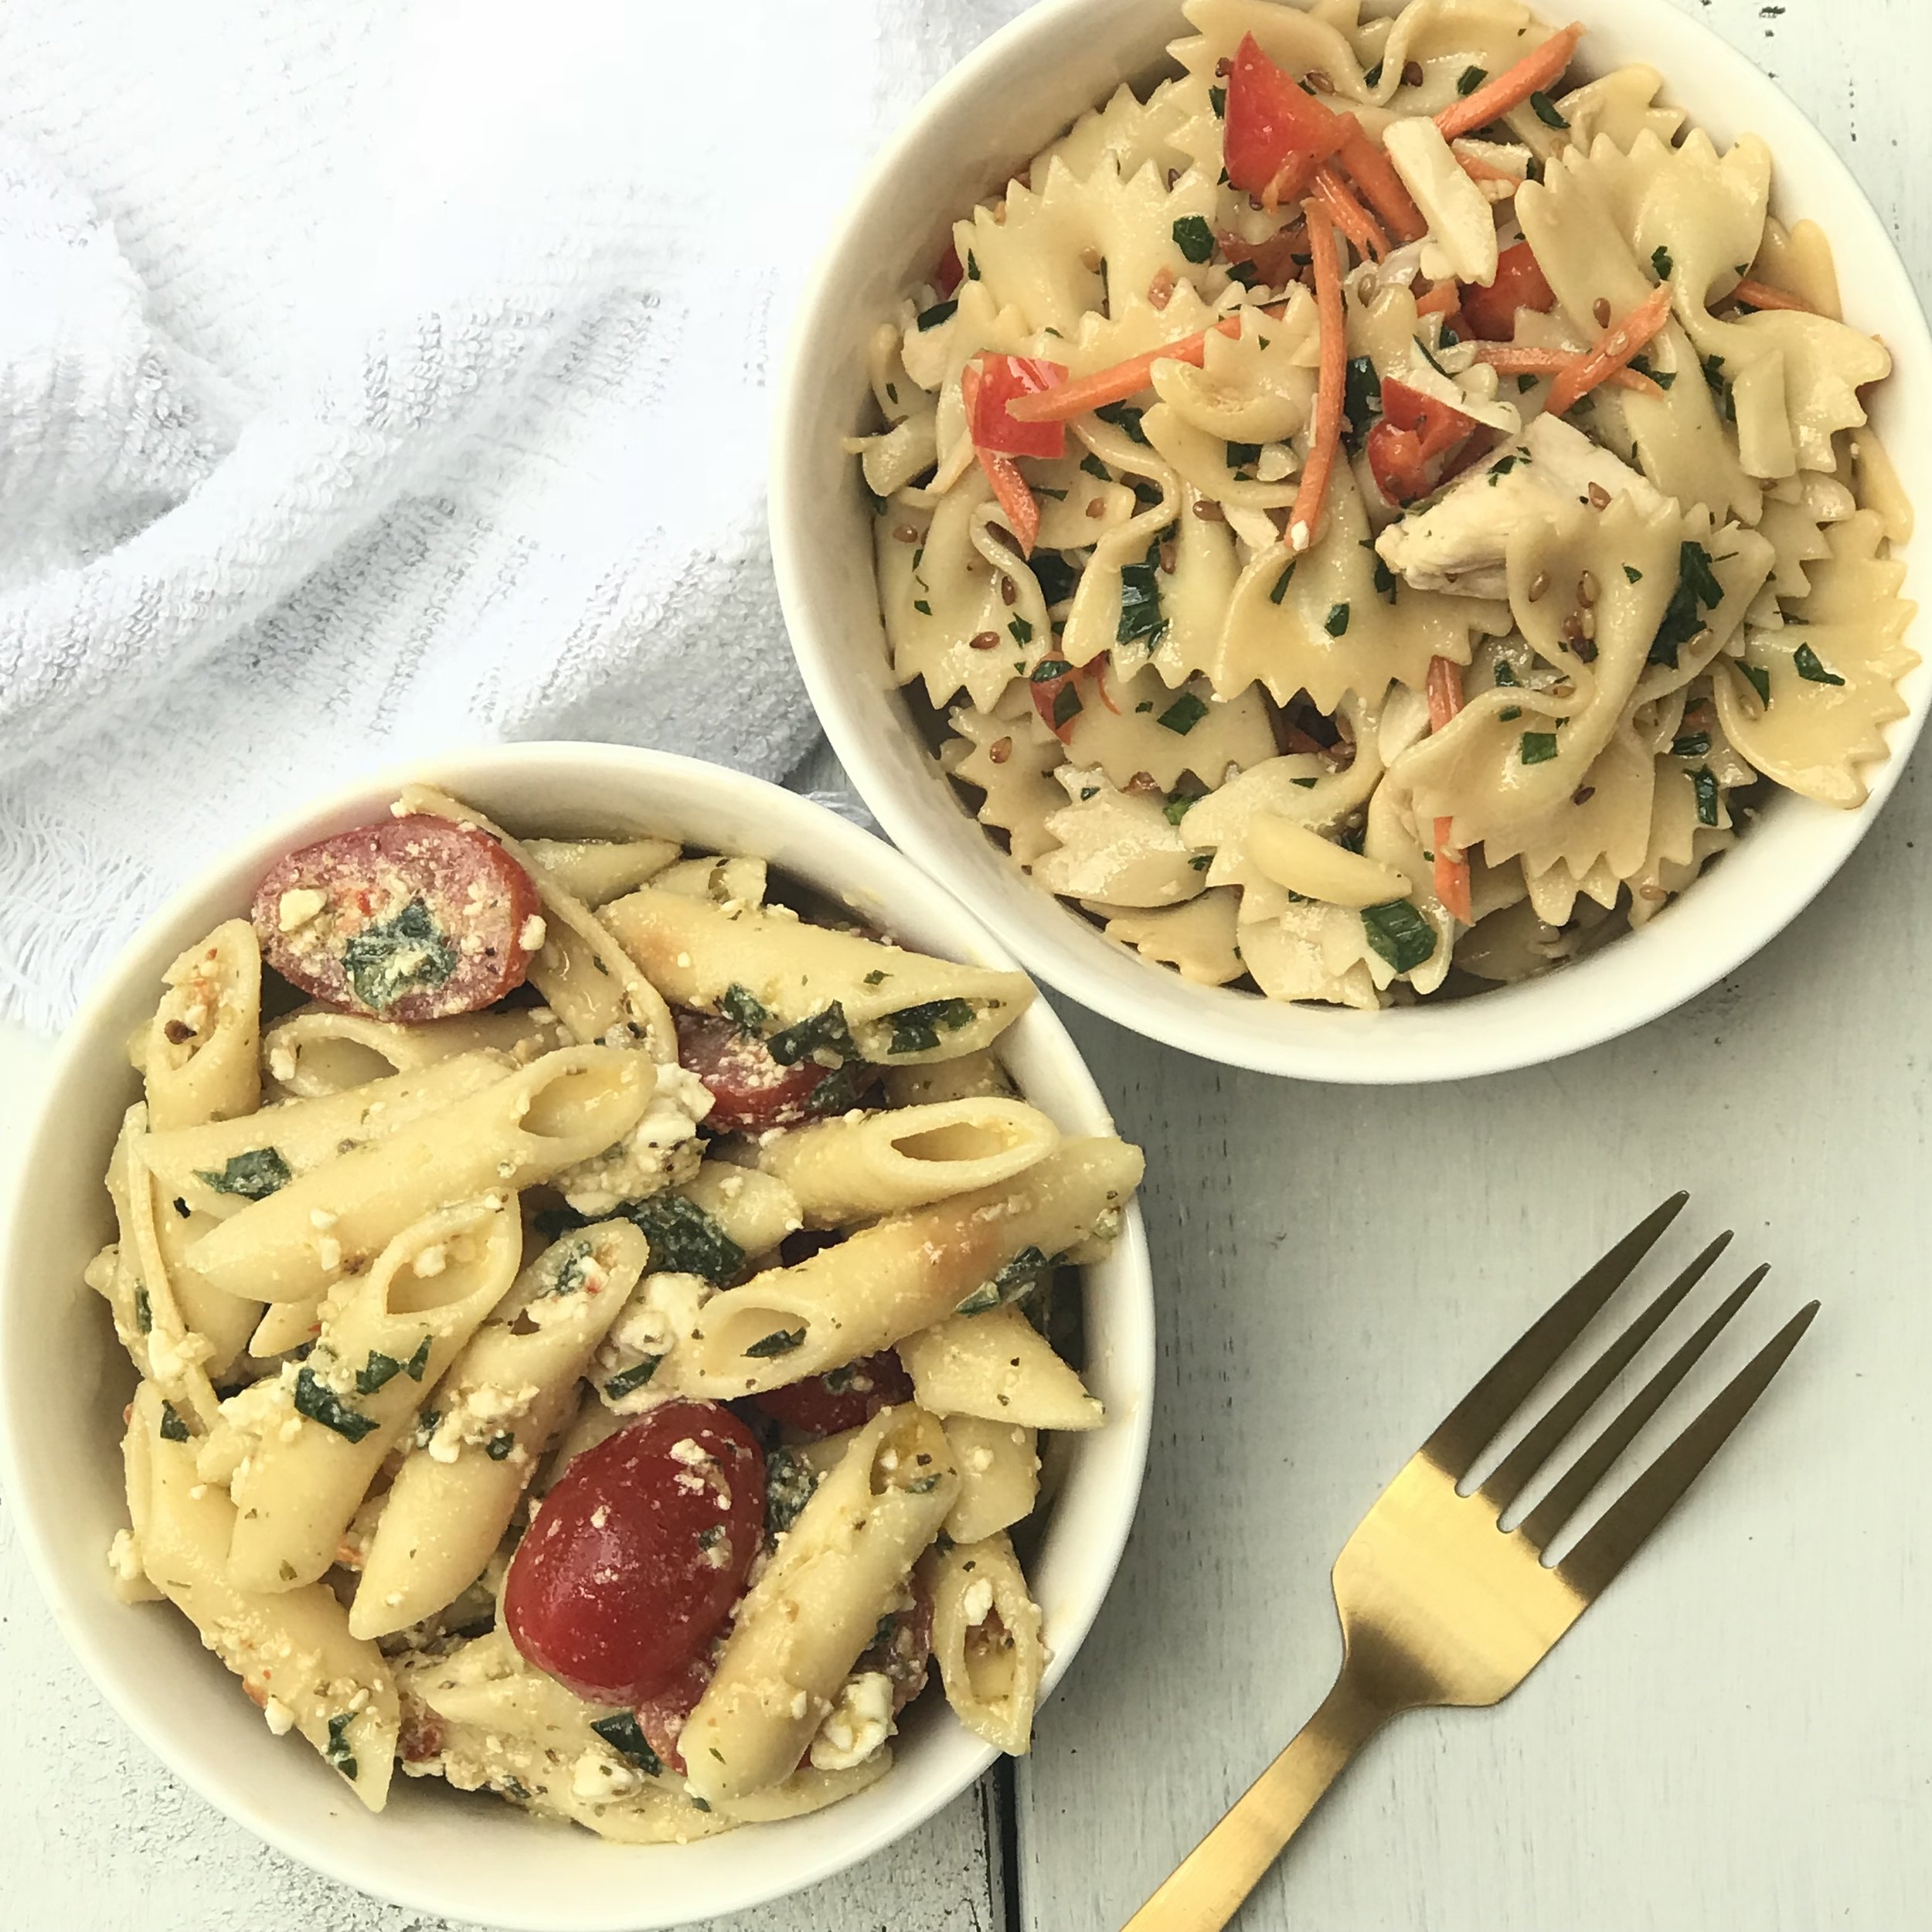
Recipe: 2 Pasta Salads You Should Make Now

It’s scorching hot in Toronto and I’m not complaining BUT the thought of spending time in front of a hot stove is making me sweat. SOOOOO, bring on the cool, bright, pasta salad! I’ve got 2 recipes for ya. Can’t decide which one to make? Try both, and leave them in the refrigerator for the week. Going to a summer potluck? Bring the Greek Pasta Salad with feta and fresh tomatoes or an Asian inspired bow tie pasta salad may be your dish of choice.


IMAGE.JPG

Greek Pasta Salad

This recipe makes a huge batch of Greek Pasta Salad. Share this recipe with friends and bring it to your next potluck This would be great for a potluck.  I usually half the recipe when I make it. We ate this for several days with lunch and dinner. This will keep for 5 days in the refrigerator. The simple mediterranean flavours of the dressing with the creaminess of the crumbled feta and fresh cherry tomatoes is exactly what is missing on your dinner table! Have is as a side or enjoy it as the main dish. 

Prep Time: 10 minutes
Cook Time: -
Total Time: 10 minutes
Serves: 10 - 12
Author: Mary Mammoliti / Kitchen Confession

INGREDIENTS

1 (16-oz) box penne pasta
2/3 cup olive oil
1/4 cup freshly squeezed lemon juice
1/2 cup mayonnaise
3 Tbsp greek seasoning
3/4 cup grape tomatoes, cut into halves
1-1/2 cups crumbled feta cheese
1/4 cup chopped fresh basil

INSTRUCTIONS

  1. Cook pasta according to package directions. Drain and cool.

  2. Whisk together olive oil, lemon juice, mayonnaise and greek seasoning in a large bowl. Add cooked pasta, tomatoes, feta cheese and basil. Toss to coat.

  3. Cover and refrigerate 8 hours before serving.

Asian Pasta Salad

This simple and light pasta salad has quickly found it's place on my summer salad list. This dish will quickly become a family favourite, and a great one to share at any potluck. It can be served as a side dish or eat on it’s own as a light lunch. This Asian Pasta Salad is completely addictive and the sesame-soy dressing will have everyone coming back for seconds!

Prep Time: 20 minutes
Cook Time: -
Total Time: 20 minutes
Serves: 8
Author: Mary Mammoliti / Kitchen Confession

INGREDIENTS

SESAME-SOY DRESSING:

1/4 cup grape seed oil
3 tablespoons rice vinegar
2 tablespoons coconut palm sugar or brown sugar
1 tablespoon sesame oil
2 teaspoons low sodium soy sauce, or tamari sauce
2 tablespoons toasted sesame seeds

PASTA SALAD:

12 ounces bow tie pasta (about 4 cups)
2 cups chopped rotisserie chicken
1 cup shredded carrot
3/4 cup roughly chopped parsley
1/2 cup thinly sliced green onion
1/2 cup diced red bell pepper
1/2 cup slivered almonds or peanuts

INSTRUCTIONS

  1. Mix together dressing ingredients in a jar or bowl with tight fitting lid. Shake well and set aside.

  2. Boil bow tie pasta for 10 minutes or about one minute shy of the package directions. Pour cooked pasta into a colander and rinse with cold water to stop the cooking process and cool down the pasta. Drain well and transfer to a large bowl.

  3. Mix in remaining salad ingredients. Give dressing a good shake and pour over the salad. Mix well.

RECIPE NOTES
If you'd like to get some of the prep out of the way you can boil the pasta the day before. Rinse it well with cold water, drain it, and then toss it with a teaspoon or two of grape seed oil to prevent it from sticking. Transfer the cooked pasta storage container, cover and refrigerate overnight. Assemble the salad no more than an hour or two before serving for the best result and reserve nuts to add just before serving.

Print Friendly and PDF

Recipe: Breakfast Hash in 30 Minutes!

I thought I would bring you a little BREAKFAST HASH on this gorgeous sunny morning. Not only does it taste fantastic, this nutrient packed meal clocks in at 30 minutes total cook time! Oh YAAAASSSSSSS! AND don’t forget to include this simple and easy meal to your weekly meal prep recipe box. This recipe should take centre stage on every brunch table, and serve it directly from the baking sheet - family style. Honestly, this quick and simple meal will tantalize your tastebuds, warm your belly, and have you dancing all the way to the kitchen sink when you're done. It's THAT GOOD! 

This dish surpassed all EGG-spectations!  I'm curious, do you hate or love eggs? Sunny side up or scrambled? Comment below and let me know what makes you egg-static about eggs. You all know how much I love a good pun :) 

Photo Description: 1 Pan dinner-large rimmed baking sheet filled with diced sweet potatoes, red bell pepper, broccoli florets, sweet corn, black beans and 6 single sunny side up eggs baked on top of the veggies

Photo Description: 1 Pan dinner-large rimmed baking sheet filled with diced sweet potatoes, red bell pepper, broccoli florets, sweet corn, black beans and 6 single sunny side up eggs baked on top of the veggies

Breakfast Hash

PREP TIME: 5 minutes
COOK TIME: 25 minutes
TOTAL TIME: 30 minutes
SERVES: 3 large or 6 small
AUTHOR: Mary Mammoliti / Kitchen Confession

INGREDIENTS

2 medium sweet potatoes, peeled and diced (Read Tips below for size)
1 head of broccoli, florets
1 medium red bell pepper, diced
1 (15-ounce) can black beans, drained and rinsed
1 cup frozen corn kernels
3 tablespoons olive oil
2 cloves garlic, minced
1 teaspoon chili powder
1/2 teaspoon ground cumin
1/2 teaspoon smoked paprika
Salt and pepper to taste
Olive Oil, to coat the sheet pan
6 large eggs

DIRECTIONS

  • Adjust your oven rack in the middle of the oven and heat to 425°F. With a little olive oil lightly coat a rimmed baking sheet.

  • Place the sweet potatoes, broccoli florets, bell pepper, black beans, and corn in a single layer on the prepared baking sheet. Add the 3 tablespoons olive oil, garlic, chili powder, cumin, and paprika. Season with salt and pepper and gently toss to combine.

  • Bake for 15 to 18 minutes stirring halfway through, until the sweet potatoes are tender. Remove the pan from the oven and create 6 wells in the vegetables. Gently crack an egg into each well, keeping the yolk intact; season the eggs with salt and pepper.

  • Return the pan to the oven and bake 7 to 9 minutes, or until the egg whites have set.

  • Enjoy!

TIPS: 

You can enjoy this dish immediately or portion it out into your to-go containers and pack it up and you have breakfast for the week. 

When chopping your veggies, try and cut them to bite size pieces and keep them roughly the same size to ensure even cooking throughout your dish. 

To make this dish even easier, buy pre-cut vegetables from you local grocery store and cut back even more on your prep time.

The olive oil can be substituted out for avocado oil or grape seed oil if you prefer. 

Leftovers can be stored in an airtight container and refrigerated for up to 5 days.

Print Friendly and PDF

Recipe: 5 Ingredient Protein Pancakes

Who said you can’t Meal Prep pancakes? This post is proof that you can. These simple 5 Ingredient Protein Pancakes will quickly become a staple in your meal prep rotation. These pancakes are loaded with protein, high in fiber and healthy fats to keep you energized all morning long! This recipe makes 7 servings of 4 pancakes per serving. Too many servings? Freeze them. Now get your griddle ready and get your flap jack on!

Photo Description: 4 round pancakes in a rectangle container with sliced strawberries, small round container of syrup with a knife and fork to the right of the container

Photo Description: 4 round pancakes in a rectangle container with sliced strawberries, small round container of syrup with a knife and fork to the right of the container

5 Ingredient Protein Pancakes

PREP TIME: 10 minutes
COOK TIME:  10 - 15 minutes
TOTAL TIME: 25 minutes
SERVES: 7 (4 Pancakes per serving)
AUTHOR: Mary Mammoliti | Kitchen Confession

INGREDIENTS

1 cup coconut flour
2 scoops vanilla protein powder
1/4 cup coconut oil, melted
8 large eggs
1 1/2 cups unsweetened almond milk (or milk of your choice) 

Toppings: 

Fresh berries
Pure maple syrup

DIRECTIONS

  1. In a medium bowl, combine all ingredients until a smooth creamy mixture forms

  2. Using a 2 tbs size measuring spoon, scoop batter batter onto a non stick or lightly oiled skillet over medium/low heat

  3. Repeat until all batter is finished

  4. Evenly divide between containers with 1/2 cup sliced strawberries

  5. Top with maple syrup just before eating and enjoy!

NOTES

  • Each serving (4 Pancakes) without toppings is packed with 17.4g of Protein, 11.4g Carbs and 5.9g Fiber

  • The absorbency of coconut flour may vary by brand resulting in a dry mixture with a thick consistency. To remedy this issue add a little extra coconut oil and/or milk of choice.

Print Friendly and PDF

Rant: Wait! WHAT? I’m going blind?

This is a hard one for me (deep breath) but it's something I need to do for myself, to keep moving forward and live my best life. I haven’t always had the  smile you see in this photo, nor have I always had a positive outlook on life. Especially when I was told I was going to slowly lose my sight and there wasn’t a damn thing I can do about it. My reaction was exactly what you would expect.

Wait! WHAT? I’m going blind?

Photo Description: Mary smiling, head tilted to the camera, wearing a studded leather jacket, t-shirt and smile necklace

Photo Description: Mary smiling, head tilted to the camera, wearing a studded leather jacket, t-shirt and smile necklace

It started at age seven. Playing a very intense game of hide and seek, my cousins and I scrambled to find our perfect hiding spot. Running down the porch steps, I missed the last one. I brushed off my scraped knee, dismissed it as  being clumsy, not thinking much about it.  As time passed, it became evident that I wasn’t missing steps because I was clumsy, but because I was struggling to see them. Months later as I stood at the top of a poorly lit staircase, ready to descend, I had difficulty deciphering where one step began and the other ended.

Over time, I began having difficulty seeing at night.  Being a vocal child (perhaps too vocal if you ask my siblings), I described the visual irregularities I experienced, and my mom scheduled an appointment with the optometrist. Sitting in the oversized chair at his office, I heard the words “she has a stigmatism”, followed by “she needs glasses, she’ll be fine. Nothing to concern yourself with.” Little did I know that was the furthest thing from the truth. Shortly after I began wearing the largest black framed glasses I could find—my nod to Yves Saint Laurent and his iconic black-framed eyewear.

Tragedy struck

When my mom lost her battle with cancer at the age of forty-seven, I lost my best friend, my protector, and the only one I confided in about my vision loss. She left behind a husband and four children. I was the youngest child at thirteen. Sadly, life continued—and so did the deterioration of my sight. Aware of my vision loss yet unaware of what this meant. Unsure of what was happening to me, as I continued to grow into a teenager, date nights and movies began. Every teenager’s dream was to go out with a group of friends—no chaperone—and catch the latest buzz-worthy movie, but I dreaded this scenario. A dark room lined with steps—lots of steps! Panic surged through my body just at the thought of trying to make it to my seat. I dismissively told myself that no one would understand. I confided in a few close friends, but we were too young and naive to understand the symptoms. Pushing that fear down deep and using humour to deflect from the real issue of my vision loss, I developed a new normal.

In my early 20s, at nightclubs and bars, I used alcohol to explain away the missed steps, or failing to notice a friend and say hello. I turned down free drinks, not wanting others to notice I couldn’t see their hand passing it to me. Although I loved to dance, I chose to dance alone because I couldn’t make out facial features or expressions so the fear of someone catching on to my struggle was paralyzing.

Coming face to face with blindness

I was twenty one and enjoying a night out with friends at a local bar. The evening was coming to an end my nightmare began. I couldn’t find my way out of the bar. I looked for a flicker of light to bounce off one of the metal door frames, but saw nothing. I relied on my distance vision in dim lighting, and I began to scan the walls of the place and there it was, a red and white lit EXIT sign. Hallelujah! Although I found my way to the door following the sign, I recognized that something was terribly wrong. 
The next morning, I walked myself into the Emergency Department of a local hospital, where they told me that I had a retinal irregularity. Unfortunately, the ophthalmologist I had the misfortune of seeing decided it was okay to blurt out “you’re going blind”. I will never forget that day, twenty four years ago. I glanced over to my sister, who was there for moral support, and saw the colour drain from her face.

Feeling helpless and alone

In shock, a tear began to stream down my face, to which the ophthalmologist responded with, “There’s no cure—stop  crying, it’s not going to change a thing. See all you can see, because it can happen very quickly”.  My sister quickly linked my arm with hers as we stood to leave the office—I’m certain if she hadn’t, I would have dropped to the floor. This is how I found out I had Retinitis Pigmentosa, a cruel degenerative eye disease that slowly robes you of sight. There is no treatment, no cure, and no control of what is happening to those suffering from the disease.


Every one of us has a story, and this is where my story begins. What came next was a lonely time of trying to hide my condition. You’ll learn more about this soon. Do I hide and let fear consume me? Only time will tell. Until we meet again. xo’s

In a world where you can be anything, be kind
 
Print Friendly and PDF

Recipe: Watermelon Berry Salad

Yesterday, I ran an Instagram poll (one of many I like to do on instagram) and the poll results are in! I posted a photo of this Watermelon Berry Salad and asked “would you like the recipe for this summer salad?” and the “Hells Ya!” have won.

Thank You all for taking part and keep scrolling down for the full recipe. These polls help me decide what recipes to post. and which I should keep to myself, locked away, deep in my archives. I hope you enjoy this salad as much as Frank and I do.

PSA: The dressing is what makes this combination shine BUT if it’s not your thing simply pour the juice of two limes over the cut fruit and toss.

If you've been following along for a while or just joined the KC foodie gang, nothing makes me happier than food. From cooking, to eating to talking about food. So, feel free to comment below. I would love to hear your thoughts. Don’t be shy, let’s chat ~ (((hugs)))

IMG_8823.JPG

Watermelon Berry Salad

Total Time: 10 minutes
Serves: 4 servings
Author: Mary Mammoliti | Kitchen Confession

INGREDIENTS

For the Salad

1/2 seedless watermelon cubed (approx. 8 cups)
1/2 cup blueberries
1/2 cup blackberries
1/4 cup crumbled feta (I used goat/sheep milk feta)
8+ mint leaves, chiffonade (cut mint leaves into slender ribbons)

For the Dressing

1 lime, juiced
2 teaspoons olive oil
2 teaspoons honey
1/4 teaspoon sea salt

INSTRUCTIONS

  1. Combine the fruit, mint and cheese in a bowl.

  2. Add the dressing ingredients to a bowl and mix well to combine. Pour over salad, toss and serve .


Print Friendly and PDF